Oct 1, 2013

CELEBRATE: Pirate Masquerade Parrr-ty!

Argh mateys! The inspiration for this Pirate Masquerade Parrr-ty evolved after discovering some elaborate pirate masks online. Once I saw the masks and later found a damask curtain with chandeliers, all of my ideas started to come together. I wanted to attempt something out of my comfort zone by mix n' matching a bunch of different styles such as elegant, gothic, eclectic, dramatic, spooky and glamour! Styling the party was affordable because I reused decor from various rooms in my home. The skulls and skeletons were from my Halloween stash that I collected last year when they went on clearance. To make them look more glamorous, I sprayed them with a glue adhesive, then sprinkled with glitter. The sophisticated color scheme consisted of black, white, silver, gold and ruby red. As the adult guests entered, they were introduced to a table of decorate your own mask supplies and pirate accessories. A separate pirate dress-up station was available for the kiddos that included eye patches, bandanas, inflatable swords, beach balls, temporary tattoos and vests made from thrift clothing. Beware: if you are late to this parrr-ty, prepare to walk the plank across shark infested waters! Captain Skeleton awaited their arrival and offered loot bags embellished with rhinestone skulls. A sea of pirate treasure covered the dessert table. The edible treasure consisted of shipwrecked cupcakes, chocolate crocodile coins, chests full of compass treats and pirate pops, canon cake balls, bloody jello, gold candies, skeleton cookies and golden caramel popcorn. This costume party theme could easily be utilized all year long to celebrate Halloween, New Years Eve, Mardi Gras, Birthdays, Girls Night, Homecoming, Prom or maybe even a daring non-traditional Wedding.  In fact, I recently photographed a wedding with very similar decor! 

Pirate Masquerade Parrr-ty Collection printables will SOON be available in the Creative Orchard Shop. 


Credits:

Party Styling & Photography: the Creative Orchard
Desserts: the Creative Orchard & Sheila Force

Sources:

Damask Curtain: Target
Skulls & Skeletons: Walmart
Table Runners, Dessert Plates, Goody Bags, Cupcake Wrappers, Cookie Cutter: Home Goods
Tissue, Gold Filler, Lollipop Sticks, Toy Compasses, Chandelier: Hobby Lobby
Card Holders, Glassware, Pirate Molds, Ribbon, Ruby Gems: Michaels
Fabric: Jeffrey Allans
Candy, Jewelry, Napkins: Party City
Bandanas, Tattoos, Eye Patches: Oriental Trading
Skeleton Bone Bags: Kroger


Sep 6, 2013

EDUCATE: Scrapbook Canvas Collage

Sooooo thrilled to announce the Creative Orchard's very first CREATIVE WORKSHOP!!! Let's celebrate the end of summer by making a "Splash" themed Scrapbook Canvas Collage! This is a one-of-a-kind class instructed by me, Renee Hagloch, that allows you to explore the latest art techniques in mixed media, such as ink misting, watercolor painting, stamping, blotting and scrapbooking. No artistic skills required, nothing needs to be perfect, personal creativity encouraged, all art supplies included and one-on-one guidance available. If the idea of meeting new people, relaxing in a fun studio space, exploring a variety of art techniques and building confidence to explore your creative side appeals to you, then a CREATIVE WORKSHOP is the event for you! Let your IMAGINATION grow and CREATIVE JUICES overflow!

The CREATIVE WORKSHOP session will be held on
Wednesday, September 25th from 6 p.m. to 8:30 p.m. 
Cost is $45.00 per person. Limited spots are available so make
RESERVATIONS as soon as possible by contacting 
"Created Just By Me" Pottery & Art Studio (309) 481-5384 
to find out more info on how to sign up.


IF you plan to attend our CREATIVE WORKSHOP... YOU will need to bring your own apron PLUS two photos that make you think of the theme "Splash" - a moment captured from a beach vacation, water park, bath time, swimming pool, blowing bubbles, squirt guns, water balloons or anything else you can imagine. PLUS the photo areas were designed to be easily interchangeable just in case you change your mind later. {IF you are age 21 or older with an ID, you are permitted to bring your own alcoholic beverage to enjoy. Please drink responsibly.}

Juicy Details:
Wednesday, September 25th from 6 p.m. to 8:30 p.m.
Cost: $45.00 per person
Creative Workshop - 12" by 12" Scrapbook Canvas Collage


"Created Just By Me" Pottery & Art Studio
110 South Main Street, Washington, IL.
(309) 481-5384
www.createdjustbyme.com
Become a fan at www.facebook.com/createdjustbyme

Instructor: Renee Hagloch of the Creative Orchard

PLEASE share the poster below to continue to promote our CREATIVE WORKSHOP!
Thank you BERRY much for your support!!!


INSPIRE: Paint Your Own Pottery Studio!

While my 16 yr. old niece, Kristi was visiting from Texas, we decided to stop by a local Pottery & Art Studio called "Created Just By Me". We already planned on doing pottery painting but there was also the option of glass fusing. First we had to choose which porcelain pottery piece we liked best from the ones displayed and it was a very difficult decision for both of us because there were so many cute options available. In the end Kristi chose a three tiered owl bank to represent the three people in her family and I picked the giant ice cream sundae bank to match my daughter, Haley's room. Might have to go back sometime to get the ice cream cone too! New options are constantly added as the seasons and holidays change throughout the year, so you should definitely check out what's NEW. In front of the pottery pieces is a label that states it's description and each ones all-inclusive price which includes the pottery piece, paint supplies and kiln firing.

Next step is choosing your paint colors. Many color samples were cleverly organized across the wall. Each color sample tile has a name and code that links to the bottles of paint. Then you just squirt a small amount of your favorite paints onto a palette and grab a brush to begin! I highly recommend making sure you allow yourself plenty of time to do THREE coats of glaze to reach your desired effect. Once you are finished painting, you carefully place your pottery on a cart next to the other bisque ware. That's it! Now the hardest part... waiting a week for your pottery to get done being fired in the kiln. We were so excited and could hardly wait for the "call" that let is now it was ready to be picked up! YAY!!! I think they both turned out so adorable! It was a wonderful memory to share with my niece and I look forward to doing again with my kids. You can view our finished projects at the end of this blog post...


BEFORE: Pottery at glazed bisque stage.
AFTER: Pottery after it has been fired.
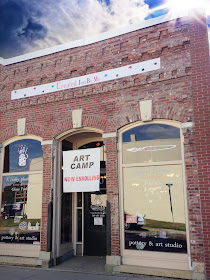
The atmosphere is a casual relaxing studio space with rustic wood flooring, extra high ceilings, natural light from oversized windows, beautiful exposed brick walls, interesting art displays and best of all a friendly staff! Jodi Adams is the sweet owner who is usually the first one to welcome you inside! In fact we have been talking for a few weeks now about me instructing some CREATIVE WORKSHOPS in her studio and my first one is coming up in September!!!! Click HERE, to find out more details or call "Created Just By Me" Pottery & Art Studio to RESERVE a spot.