Dec 21, 2011

INSPIRE: That's A Wrap!

This year before wrapping gifts, I decided to seek INSPIRATION on Pinterest. As if I really need another "reason" to visit their website and feed my addiction. I spotted many ideas from bloggers that got creative with CRAFT PAPER packaging. The first image is of the gift wrap that I created based off of my top 12 favorites inspirations which can be seen after my example... That's A Wrap! 
HAPPY HOMEMADE HOLIDAYS!


Creative IDEA 1: Paper Straw Snowflakes
Source: Centsational Girl
Creative IDEA 2: Reuse Shopping Bags 
Source: A Creative Mint
Creative IDEA 3: Monogram Gift Tags 
Source: Haute Apple Pie


Creative IDEA 4: Recipe Labels 
Source: Think Garnish
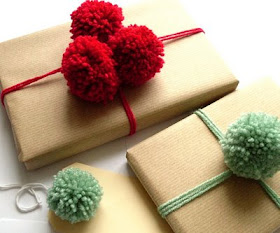
Creative IDEA 5: Yarn Pom Pom Bows
Source: Bugs and Fishes
Creative IDEA 6: Washi Tape
Source: The Sweetest Occasion
Creative IDEA 7: Photo Tags
Source: Pear Tree Greetings
Creative IDEA 8: Book Page Pinwheels 
Source: Classy Columbus Designs
Creative IDEA 9: Doilies and Felt Coasters 
Source: A Creative Mint
Creative IDEA 10: Typographic Names 
Source: Man Made DIY
Creative IDEA 11: Snowflake Cut-out
Source: How About Orange
Creative IDEA 12: Candy Favors
Source: stephmodo

Dec 19, 2011

CELEBRATE: Favorite Things Celebration

FAVORITE THINGS CELEBRATION
"Let's CELEBRATE your FAVORITE THINGS, FAVORITE FOODS and FAVORITE DRINKS with your FAVORITE PEOPLE!

How does it work? Each person brings 5 of their FAVORITE THING and it can't cost more than $5. Now let's do the math... 5 of the same item times $5 each equals a $25 total budget. Got it? Number of guests invited and amount of budget may vary according to the party host. You can choose one of anything you like such as your FAVORITE lotion, gift card to your FAVORITE store, FAVORITE kitchen utensil, box of your FAVORITE candy, FAVORITE magazine, etc. In addition to the gifts, you could also ask everyone to share their FAVORITE FOOD or DRINK.

Once you have arrived at the party, write your name on five slips of paper and toss in a bowl. Pass the bowl around so that each guest can draw five different names (be sure not to pick your own). One at a time each person introduces their FAVORITE THING and then reads out loud the five names they picked from the bowl while giving their FAVORITE THING to those five guests.

After everyone at the party has presented their FAVORITE THING, each individual should end up with 5 gifts. As a courtesy, the host should provide a gift box or bag for them to conveniently take their gifts home. The most interesting part of the party is seeing what other people have chosen to share as their FAVORITE THING! Who knows, maybe someone else's FAVORITE THING may end up being your NEW FAVORITE THING?

This "Celebrate Favorite Things" PARTY FEATURE can also be seen online inside "HomeMade for the Holidays" 2011 Idea Guide! Click Here.

"Confetti Celebration" Printable Collection is currently available in the Creative Orchard Shop for a limited time only! Holiday Special Price!


Product Sources:
Printables "Confetti Celebration" Collection - the Creative Orchard Shop
Gray Striped Paper Straws, Twine - Shop Sweet Lulu
Glitter Paper, Frame Stand, Glass Ball Candlesticks, Gable Boxes - Hobby Lobby
Clear Acrylic Tray, Straw Dispenser - Home Goods
Ornament Garland, Dot Spray, Dot String - Target
Martini Shaker - Bed, Bath & Beyond
Sand Hourglass - Z-Gallerie
Margarita Glasses - Pier 1
Plastic Cups - JC Penney
Mirrored Trees - Dollar Tree
White Christmas Tree - Sears (Martha Stewart Everyday)

Dec 16, 2011

CREATE: Easy Edible Snow Globe

As seen in "HomeMade for the Holidays" Idea Guide, the Easy Edible Snow Globe is a creative substitute for the traditional gingerbread house. Depending upon the size of your "snow globe"... a small one could be displayed at a single place setting or a large sized one as a table centerpiece. This is a fun, yummy, affordable and easy holiday project for kids or adults!

Supplies Needed:
• ribbon
• tape
• cupcake liner
• glass round vase/fish bowl
• bowl (cereal size)
• plate (saucer size)
• tooth picks/lollipop sticks
• assortment of soft candies (gum drops, fruit slices, marshmallows, etc.)
• sno ball cake
• peppermint stick
• holiday lollipop
Instructions:
TIP: Get creative with your edible snow globe scene supplies
and try decorating with any of your favorite candies!
1.) Create an edible snow globe scene by using a sno ball cake as the base, insert an assortment of candies into the cake with tooth picks/sticks. When done, set aside.
2.) Start to build your snow globe by placing plate right-side-up on a table surface. Place bowl upside-down on top of a plate. Then carefully set your edible snow globe scene on the bottom of the bowl. Place a glass round vase upside-down over the entire scene.
3.) Add decorative touches by taping a thick ribbon around the base of the globe. Tape a small bow to the bottom of an upside-down cupcake liner and finish by setting it on the top of the globe. Now you have an Easy Edible Snow Globe to munch on!


Product Sources:
Cupcake liners - Shop Sweet Lulu
Ceramic bowl and plate - Target
Glass round vase and ribbon - Hobby Lobby
Holiday lollipops, gum drops, sno ball cakes and tooth picks - Walmart
Peppermint sticks - Party City


Dec 7, 2011

INSPIRE: 2011 "HomeMade for the Holidays" Idea Guide


HomeMade for the Holidays has been published and ready to be viewed! The Creative Orchard's first issue of our Idea Guide includes an eclectic collection of contributors that share creative inspirations, styling tips, DIY holiday decor, homemade recipes, gift ideas, project tutorials and MUCH MORE!


Visit my blog frequently this month for MORE detailed posts of some of the Creative Orchard's projects and printables already seen in the Idea Guide.

We hope HomeMade for the Holidays Idea Guide creatively inspires you this season! WARMEST HOMEMADE HOLIDAY WISHES!

Thanks to ALL the CONTRIBUTORS:
Pen n' Paper Flowers
LA Creative Studio
Sweet Little Details
Beautiful Days
MADE
Sitting in a Tree
Shop Sweet Lulu
Frog Prince Paperie
Bakerella
Celebrations at Home
Etsy
Pinterest

Sep 26, 2011

INSPIRE: DIY Cake Stands - Top 12 Tutorials!

Although there are some GORGEOUS cake stands out there to purchase, it can become a quite costly investment. I am not sure about everyone else, but I prefer not to use the same one over and over again for every dessert table, I like lots of party styling options! Plus, not just any cake stand goes with every parties' style. Sometimes I need a cake stand that is big or small, short or tall, round or square, neutral or bright, elegant or maybe even whimsical! Recently, especially on Pinterest, I have noticed more and more bloggers are sharing Do-It-Yourself Cake Stand Tutorials. These are my favorite top 12 tutorials because they are creative, simple, easy, affordable and above all... ADORABLE! 

Below are just images of the DIY cake stands, click on the web links under each photo to view their own individual step-by-step instructions. Kudos to all that were kind enough to share their DIY cake stand projects! 

You can view my OWN VERSION at the very bottom of this post after image #12!!!
1.)  DIY Mini Cupcake Stands by Modern Moments Custom Designs [CLICK!]
2.)  DIY Stenciled Cake Stand by The House of Smiths [CLICK!]
3.)  DIY Wedding Cake Stands by Bee in our Bonnet [CLICK!]
4.)  DIY Colorful Cake Stands by The Party Dress - WH Hostess [CLICK!]
5.)  DIY Interchangeable Summery Cupcake Stands by Giverslog [CLICK!]
6.)  DIY Tiered Trays by Joys Hope [CLICK!]
7.)  DIY Colorful Dessert Stands by Censational Girl [CLICK!]
8.)  DIY Cake Stands by A Well Crafted Party for Eat Drink Pretty [CLICK!]
9.)  DIY Mirrored Cake Stands by Tradewind Tiaras, Inc. [CLICK!]
10.)  DIY Cupcake Stand by Brooke from The Crafting Chicks [CLICK!]
11.)  DIY Cupcake Tower by Annie's Eats [CLICK!]


12.)  DIY Tree Pedestal Cake Stand by Laurie Cinotto for Once Wed [CLICK!]


These five photos BELOW are the results of my own DIY Cake Stand which I created by glueing (E 6000 Glue) a large melamine plate on top of a ceramic candle stick then glued an upside-down small melamine plate on bottom. (All my supplies were from Target stores.)